WordPress is the most popular CMS platform providing a lot of amazing features for creating, publishing, and managing content. By default, when you publish a page on a WordPress website, it automatically has public visibility. However, WordPress allows you to natively change the visibility status and add a password to the WordPress page with just a few clicks.
Password protect WordPress page is a security way for limiting public access to the content of your website. Using this simple security method, you can restrict the access of users to some pages of your website. When you add a password to WordPress pages, visitors of your WordPress site must enter the password to land on that password-protected page.
In this post, we want to show you how to create a password protected page in WordPress with two methods:
- Use the built-in password-protect WordPress page feature in Classic or Gutenberg editor
- Use WordPress plugin to password protect page
Let’s review a step-by-step guide to learn how to create a password protected page on WordPress with both methods.
How to create a password protected page in WordPress without a plugin?
WordPress already provides an option to make WordPress pages password protected with a fairly simple process. There is no need to add code or modify any back-end files.
To create a password protected page in the WordPress editor, log in to your WordPress dashboard and go to Pages > All pages.
Then hover over the page you want to protect with password and press the Edit option.
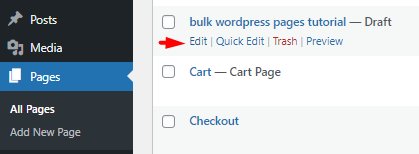
In this step, WordPress will open the page in Classic or Gutenberg editors based on your website settings. Continue reading to learn how to add a password to the WordPress page in each editor.
Create password protected page in WordPress classic editor
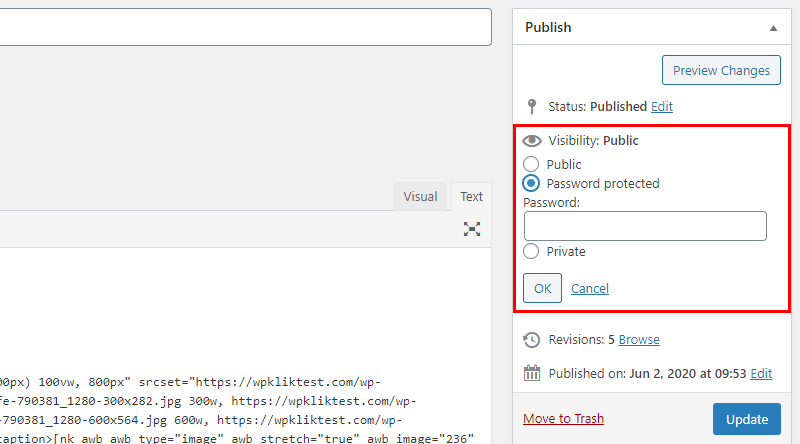
Once you open the page in Classic Editor, the Publish meta box will be displayed on the right corner of the screen.
So, to make your WordPress page password protected, follow the below steps:
- Locate the Visibility option in the Publish meta box which is set to Public by default.
- Click on the Public option to see the other visibility options.
- Select the Password Protected option.
- Insert a password for your content in the textbox.
- Press the OK button and finally click the Update button.
If you visit the password protected page, you will see a message with an enter password form instead of the page content like below:
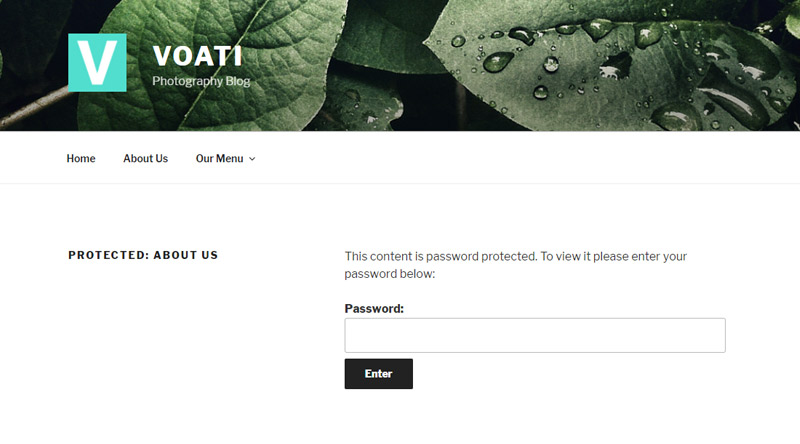
The main content is displayed to the visitors, only if they insert the password correctly.
Password protect single page in WordPress Gutenberg editor
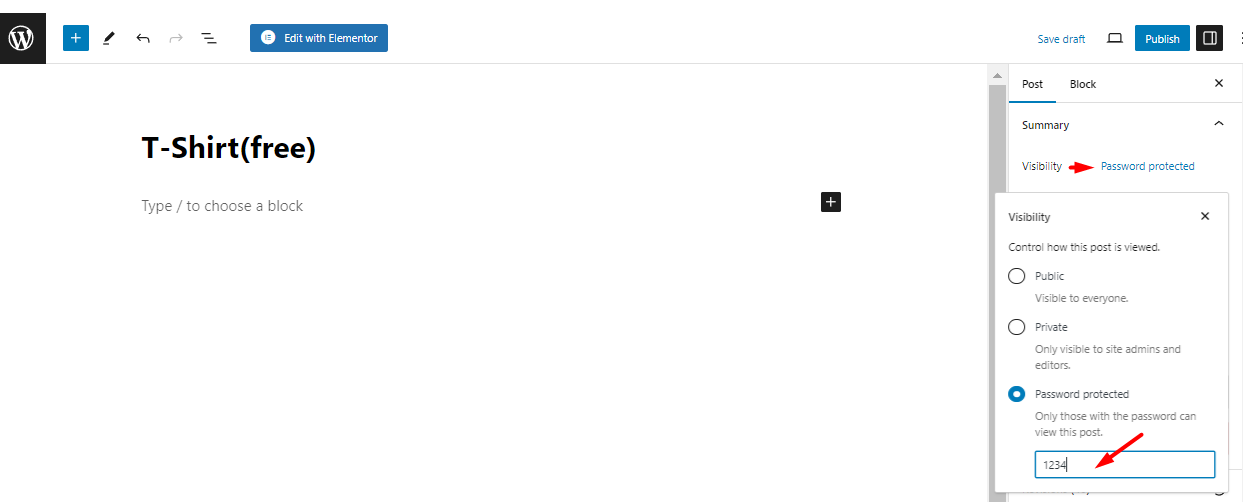
The steps to password protect WordPress pages in Gutenberg editor are similar to the Classic Editor. You just need to:
- Edit the desired page that you want to make password-protected.
- Open the Post section in the Right panel.
- Locate the Visibility field and click on it.
- Select the Password protected option in the Visibility pop-up.
- Enter your password in the textbox.
- Press the Publish button.
If users visit the password protected page, they will receive a message like below:
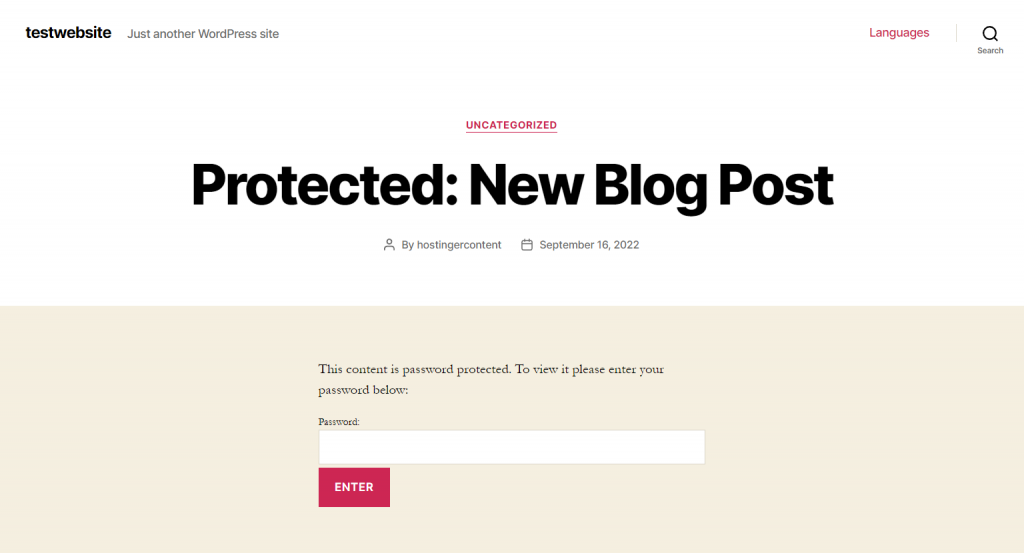
So, they have to write the password correctly to have access to the page content.
Use quick edit to protect WordPress page with password
Quick Edit is a simple and fast way to add or edit password-protected page WordPress. To use this method, follow the instructions below:
- Go to WordPress Dashboard > Pages > All pages.
- Hover over the page you want to lock it with the password.
- Click on the Quick Edit option.

- Locate the Password field.
- Enter your password in the textbox.
- Press the Update button.
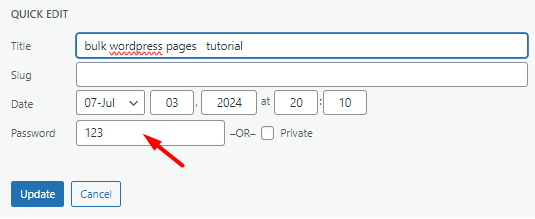
That’s it. You successfully protect the page with a password in WordPress.
Although the native WordPress editor is the easiest way to create a WordPress custom password protected page, it doesn’t offer a flexible filtering option to let you find the page you need. The built-in feature also doesn’t allow you to bulk add or bulk edit passwords to multiple pages.
So, if you are looking to add, edit, or remove WordPress password protect multiple pages, you need to use the WordPress posts/pages bulk edit plugin.
Continue reading to learn how WordPress posts/pages bulk editing plugin can help you to easily bulk edit password protected pages in WordPress.
How to create multi password protected page on WordPress with a plugin?
WordPress posts/pages bulk editing plugin comes with flexible tools for filtering, creating, and bulk editing posts, pages, and custom posts. It can be used for bulk editing password-protected WordPress pages and also offers additional features that let you manage the all contents in your website more efficiently.
Let’s see how to make multi password protected pages in WordPress with this plugin.
Step 1: Install WordPress posts/pages bulk edit plugin
To bulk edit a WordPress page protected by password, you need to start by setting up the WordPress bulk edit posts/pages plugin. The installation and activation process is very simple. However, in case of any problem, click here to read the installation tutorial.
Once you have activated the plugin, you have access to all necessary tools to add a password to WordPress pages by navigating to the below address:
WordPress dashboard > IT Bulk Editing > WP Posts
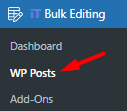
On this page, a list of all WordPress posts are visible in a table with customizable columns. There is also a comprehensive toolbar on top of the table that helps you to add, edit, and manage all WordPress posts, pages, and custom posts in bulk.
As we aimed to make the WordPress page password protected in this tutorial, using the following tools in the Toolbar are needed:
- Post type switcher
- Filter tool
- Bulk Edit tool
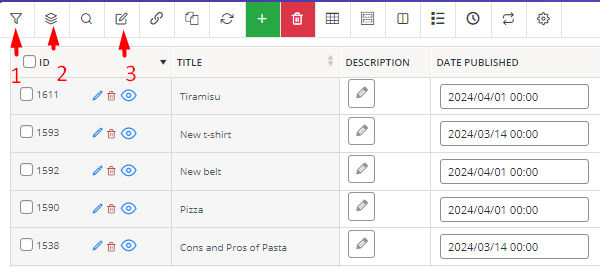
In the following steps, we will show you how to use these tools for password protect multi WordPress pages in bulk.
Step 2: Switch to the WordPress page
The first tool you need to use before trying to bulk edit password protected page WordPress is Post Type Switcher. Once you install the plugin, all WordPress posts, pages, and custom posts are imported into the plugin and all WordPress posts are listed in the table by default.
So, when you want to set a custom password protected page in WordPress, you have to use Post Type Switcher tool to display pages in the table.
To make this happen, you just need to select Post Type Switcher tool on the toolbar then open the dropdown list of Select post type field and finally choose Page from the list.
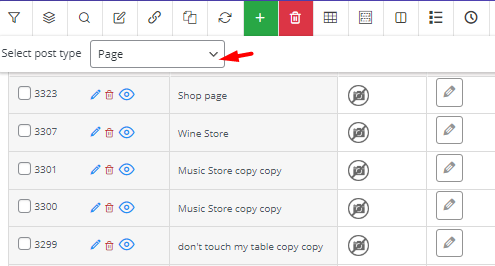
As illustrated above, the plugin will automatically list all WordPress pages in the table.
Step 3: Filter WordPress pages
In the next step, you can find the exact pages for bulk editing WordPress password protect multiple pages via a powerful Filter Form.
To access the Filter Form, select the Filter icon on the plugin toolbar and you will see a smart form with flexible options for filtering pages based on any WordPress fields. The Filter Form has many advantages, for example, you will see three different tabs with a list of relevant fields in each one, including:
- General: To filter using popular fields like Page ID, Page Title, Page Content, Page Excerpt, etc.
- Date & Type: To filter based on published date, page status, etc.
- Custom fields: to find pages by custom fields you have already added to WordPress
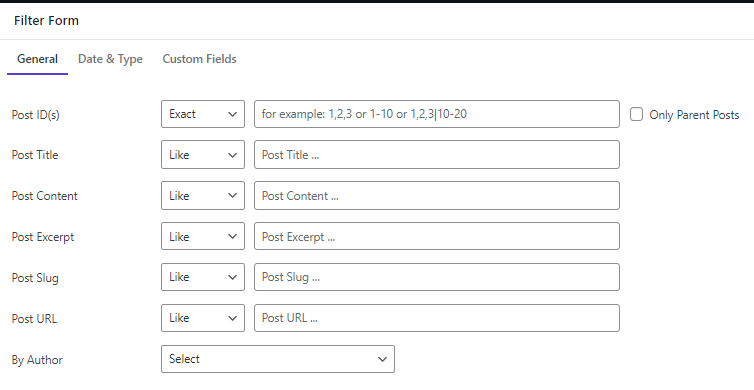
Moreover, specific operators are designed for each field to help you quickly find what you need.
Adding filter conditions has no limitations. So, you can set complicated options for multiple fields and find those pages required to protect with passwords efficiently.
Step 4: Add password to multi WordPress page
After filtering the target pages, it’s time to edit password protected page WordPress by following the below steps:
- Mark some pages in the table.
- Open the Bulk Edit form by selecting the related tool on the toolbar.
- Go to the General tab and locate Post Password
- Choose one of the operators from the first dropdown list.
- Enter your desired password.
- Choose the proper variable (Optional).
- Press the Do bulk edit button.
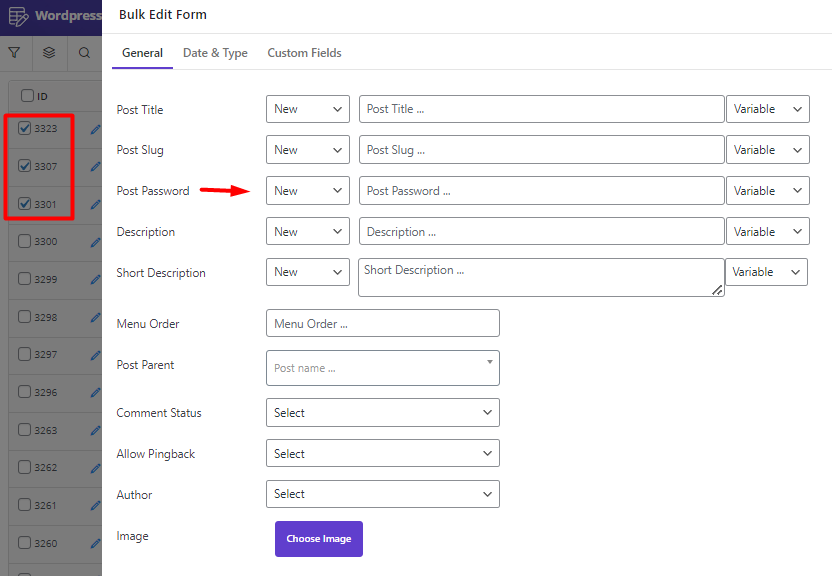
The advanced bulk edit form provided in the WordPress plugin simplifies the process of creating and editing password protected pages with built-in features which are:
Built-in operators to make desired changes on WordPress page password
To help you easily make a custom password protected page in WordPress, the following operators are available in the Post Password field dropdown list:
- New: To create a new password for selected pages.
- Append: To add text or variable at the end of the selected WordPress page password.
- Prepend: To add text or variable at the beginning of the selected WordPress page password.
- Delete: To remove text or variables from the selected WordPress page password.
- Replace: To replace the text or variable of the selected WordPress page password with a new text or variable
- Clear: To completely remove the selected WordPress page password.

Text box for inserting Page Password
The text box allows you to type any text or number you want to use as WordPress custom password.
Variable field for adding default variables to the password
The Variable field is designed to help you customize WordPress password protected page with one click. You can choose one or more variables from the list to be used as a password or add to any text you have already inserted into the textbox.
For example, we tried to set a new password for some selected pages by a combination of 1234 with the title of each page:
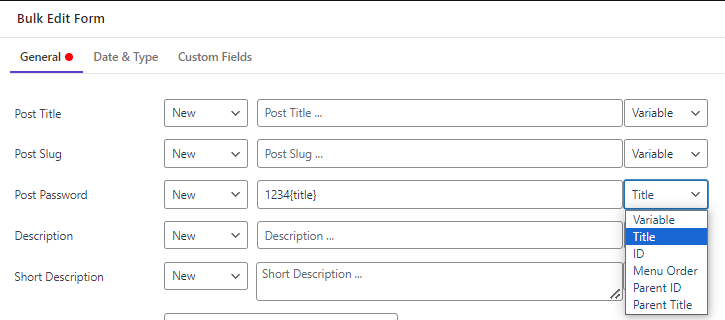
The result is exactly as we expected:

Remove the password protect WordPress page
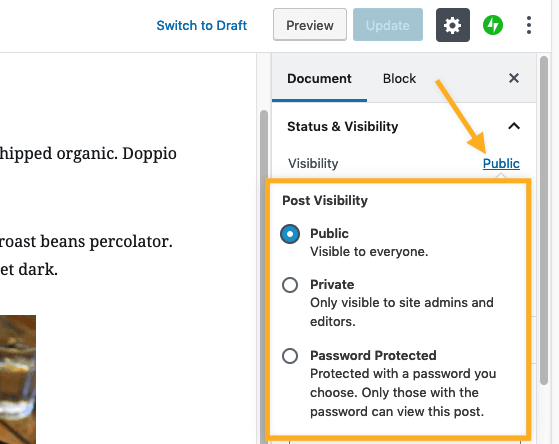
If you want to remove password from a single page in WordPress, simply open the Visibility field in the Classic or Gutenberg editor as we mentioned before then set the Visibility to Public and Update the page.
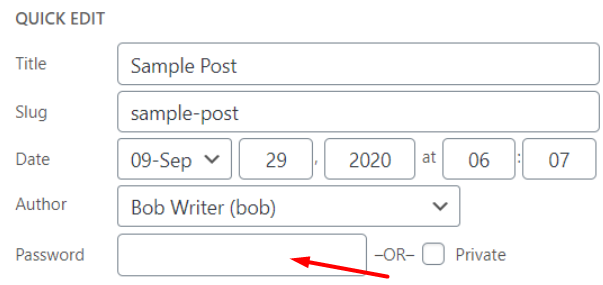
It is also possible to use Quick Edit and remove the password you have set before and update the page.
However, to bulk remove passwords from multiple WordPress pages at once, you have to use WordPress bulk edit plugin and follow the below instructions:
- Mark some pages in the table.
- Open the Bulk Edit form and go to the General tab.
- Locate Post Password and choose Clear from the operator dropdown list.
- Press the Do Bulk edit button.
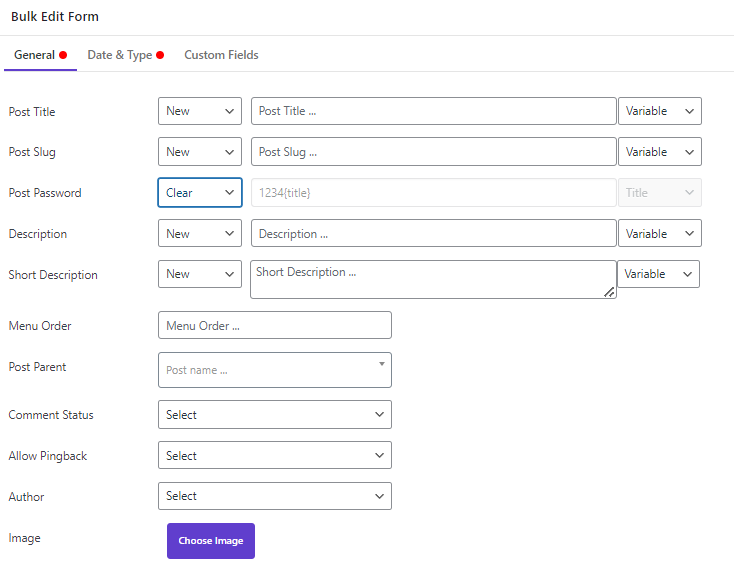
As you can see, the Post Password will be removed from the selected pages after applying the bulk actions:

Why do site managers need to make WordPress pages password-protected?
Password protect WordPress page is exclusive content for a specific group of users and it is useful when site managers want to restrict the access of public users and prevent them from viewing some content of their websites.
There are several reasons why administrators might want to protect some pages and don’t let users visit them unless having the right password. Let’s review some reasons:
Share specific content with clients or members
Adding passwords to WordPress pages created for specific purposes like landing pages is popular among web designers especially when they want to show the progress of web designs to their clients or get their feedback.
It is also a great solution when you want to share the content of your WordPress website with specific subscribers or members. By creating a password protected page on WordPress website, you can provide special members – for example, subscribers who paid a high-level membership – with privileged information, expert support, or advanced tutorials.
Improve the security of important content
Creating a password protected page on WordPress could be useful if the page contains sensitive information, like personal documents, bank account details, etc. In this case, administrators can restrict access to the private contents to hide them from public users.
Share exclusive content with a group of users
If you want to provide specific information like a very specific article, a PDF guide, a special announcement, etc. With a group of users, you can create password password-protected page in WordPress and share the password with those users only.
Conclusion
Password protect page in WordPress is one of many useful methods to secure your website. It allows you to hide personal information from public users or restrict access of public visitors to exclusive content which is prepared for rewarding special members or subscribers.
if you want to password protect single page WordPress, using simple built-in WordPress function suites you. However, for bulk editing custom password protected page WordPress, you need to use a password protect WordPress plugin. The WordPress posts/pages bulk editing plugin that we recommended in this post comes with a user-friendly interface and functional tools for creating, managing, and bulk editing all features of WordPress posts, pages, and custom posts.


