WooCommerce add multiple products to cart is one of the best tactics for improving the customer buying experience. By default, the process of adding products to the cart in WooCommerce has many steps, and customers need to spend a lot of time adding products to their carts individually and then proceeding to the checkout page. If you want to simplify this process for your customers, follow the guide provided in this post. We will show you how to add multiple products in WooCommerce by both coding and WooCommerce bulk add to cart plugin.
What is bulk add to cart for WooCommerce?
WooCommerce add multiple products to cart is a useful technique that lets your customers mark a checkbox next to the products listed in a table and then add multiple items to their carts with one click. The button for adding multiple products to the cart can be designed in the navigation bars like the header or footer.
To show the WooCommerce products in a table and allow customers to bulk add them to their cart, you can either use a piece of code – which is not recommended if you are not an expert or a WooCommerce bulk add to cart plugin.
Let’s review both methods together.
WooCommerce add multiple products to cart by creating a customized URL
Creating a personalized URL allows you to add multiple products to the cart option in your store. To use this method, first, you need to create a child theme, then copy the below code in funcfions.php:
function webroom_add_multiple_products_to_cart( $url = false ) {
        // Make sure WC is installed, and add-to-cart qauery arg exists, and contains at least one comma.
        if ( ! class_exists( 'WC_Form_Handler' ) || empty( $_REQUEST['add-to-cart'] ) || false === strpos( $_REQUEST['add-to-cart'], ',' ) ) {
                return;
        }

        // Remove WooCommerce's hook, as it's useless (doesn't handle multiple products).
        remove_action( 'wp_loaded', array( 'WC_Form_Handler', 'add_to_cart_action' ), 20 );

        $product_ids = explode( ',', $_REQUEST['add-to-cart'] );
        $count       = count( $product_ids );
        $number      = 0;

        foreach ( $product_ids as $id_and_quantity ) {
                // Check for quantities defined in curie notation (<product_id>:<product_quantity>)

                $id_and_quantity = explode( ':', $id_and_quantity );
                $product_id = $id_and_quantity[0];

                $_REQUEST['quantity'] = ! empty( $id_and_quantity[1] ) ? absint( $id_and_quantity[1] ) : 1;

                if ( ++$number === $count ) {
                        // Ok, final item, let's send it back to WooCommerce's add_to_cart_action method for handling.
                        $_REQUEST['add-to-cart'] = $product_id;

                        return WC_Form_Handler::add_to_cart_action( $url );
                }

                $product_id        = apply_filters( 'WooCommerce_add_to_cart_product_id', absint( $product_id ) );
                $was_added_to_cart = false;
                $adding_to_cart    = wc_get_product( $product_id );

                if ( ! $adding_to_cart ) {
                        continue;
                }

                $add_to_cart_handler = apply_filters( 'WooCommerce_add_to_cart_handler', $adding_to_cart->get_type(), $adding_to_cart );

                // Variable product handling
                if ( 'variable' === $add_to_cart_handler ) {
                        woo_hack_invoke_private_method( 'WC_Form_Handler', 'add_to_cart_handler_variable', $product_id );

                // Grouped Products
                } elseif ( 'grouped' === $add_to_cart_handler ) {
                        woo_hack_invoke_private_method( 'WC_Form_Handler', 'add_to_cart_handler_grouped', $product_id );

                // Custom Handler
                        do_action( 'WooCommerce_add_to_cart_handler_' . $add_to_cart_handler, $url );

                // Simple Products
                } else {
                        woo_hack_invoke_private_method( 'WC_Form_Handler', 'add_to_cart_handler_simple', $product_id );
                }
        }
}

// Fire before the WC_Form_Handler::add_to_cart_action callback.
add_action( 'wp_loaded', 'webroom_add_multiple_products_to_cart', 15 );


/**
 * Invoke class private method
 *
 * @since   0.1.0
 *
 * @param   string $class_name
 * @param   string $methodName
 *
 * @return  mixed
 */
function woo_hack_invoke_private_method( $class_name, $methodName ) {
        if ( version_compare( phpversion(), '5.3', '<' ) ) {
                throw new Exception( 'PHP version does not support ReflectionClass::setAccessible()', __LINE__ );
        }

$args = func_get_args();
        unset( $args[0], $args[1] );
        $method = $reflection->getMethod( $methodName );
        $method->setAccessible( true );

        //$args = array_merge( array( $class_name ), $args );
        $args = array_merge( array( $reflection ), $args );
        return call_user_func_array( array( $method, 'invoke' ), $args );
}
To see the result, you can use the below-customized URL:
For adding 1 quantity of multiple products, just write their ID one time as shown below:
https://www.example.com/cart/?add-to-cart=12345,43453For adding more than one from a product, copy the product ID multiple times at the end of the URL as illustrated below:
https://www.example.com/cart/?add-to-cart=12345,12345,12345It is also possible to add quantity to the end of the URL as follows:
https://www.example.com/cart/?add-to-cart=12345&quantity=3Although by using a customized URL, you can solve the problem of WooCommerce adding multiple products to the cart, it is not the customer-friendly solution that attracts your customers to buy from your store. For example, suppose that your customers want to add multiple variations to the cart at once. Can this method really encourage them to choose your site among your competitors?
To help you convince customers to buy products from your shop, your ultimate solution is using the WooCommerce bulk add to cart plugin. Continue reading to learn how the WooCommerce product table plugin simplifies the process of adding multiple products to cart for your customers.
The best WooCommerce bulk add to cart plugin
There are many reasons for introducing the WooCommerce product table plugin as the best bulk add to cart plugin. In addition to displaying all your products in a table view, it allows you to add as many columns as you need to your product table. It is also possible to customize your table by adding filters, pagination, search boxes, etc. However, the most amazing feature of this plugin is facilitating the purchase process for your customers by letting them add multiple items to their cart.
Let’s see how.
Step 1: Install WooCommerce product table plugin
The first step to using this WooCommerce bulk add to cart plugin is downloading, installing, and activating it on your WordPress website.
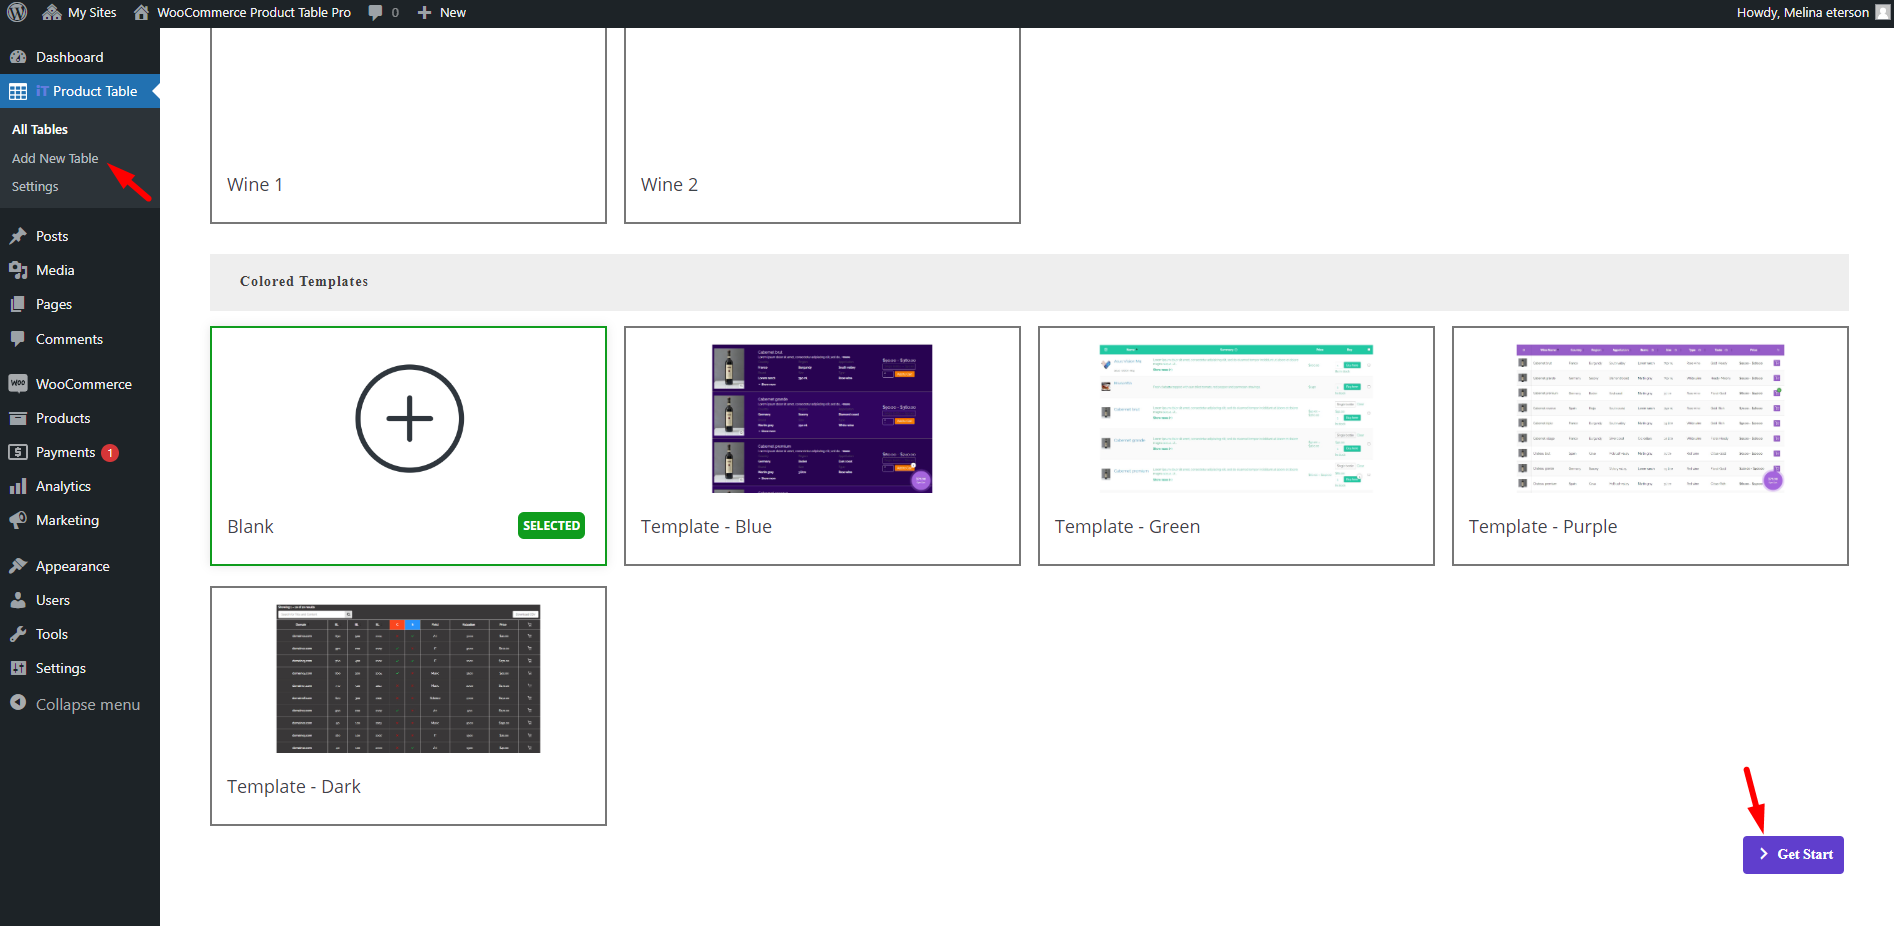
Now, you can start creating a new product table by choosing the Add new table option from the iT Product Table menu. In the new page appears, scroll down and click on the get started button.
WooCommerce Product Table Plugin
The easy way to bulk add products to WooCommerce cart

Step 2: Add columns to the product table
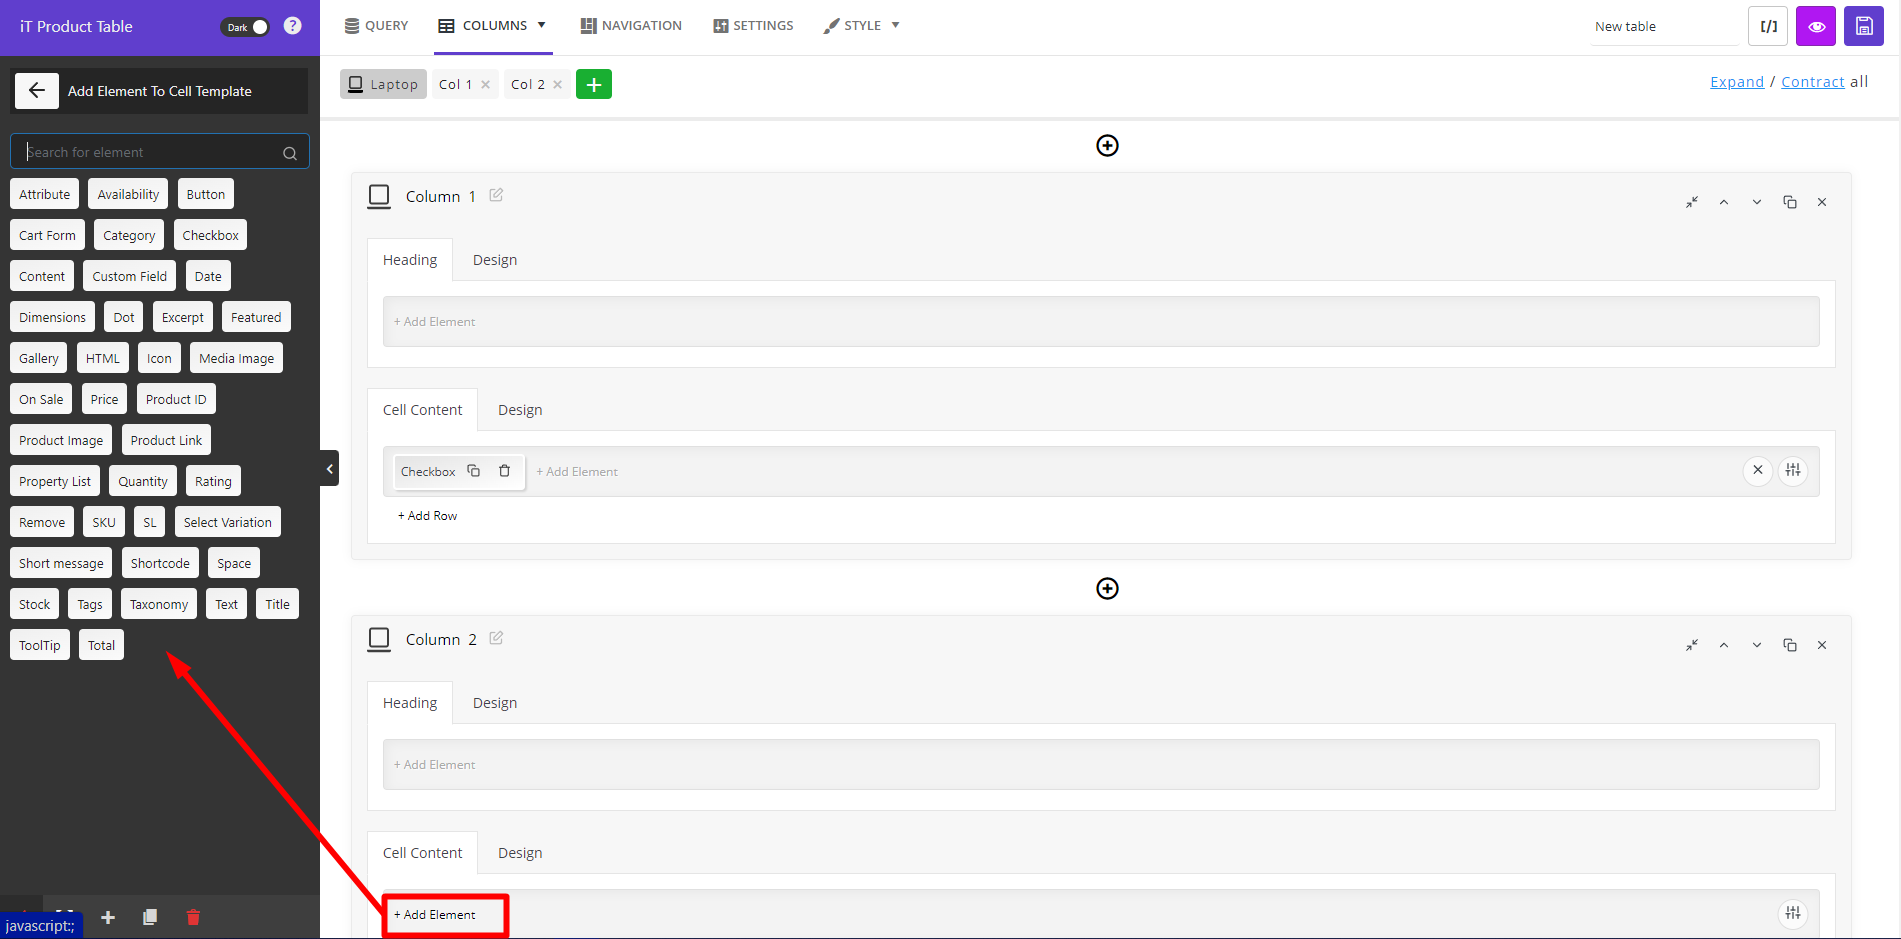
The next step is adding the appropriate columns to the product table by going to the Columns tab. The user-friendly interface of the WooCommerce product table plugin allows you to easily add new columns and assign content to them by following the below instructions:
- Click on the Add a column button to see the elements you can assign to it in the left panel.
- Choose one of the elements from the left panel.
- Customize the element by using the options in the General and Style tabs.

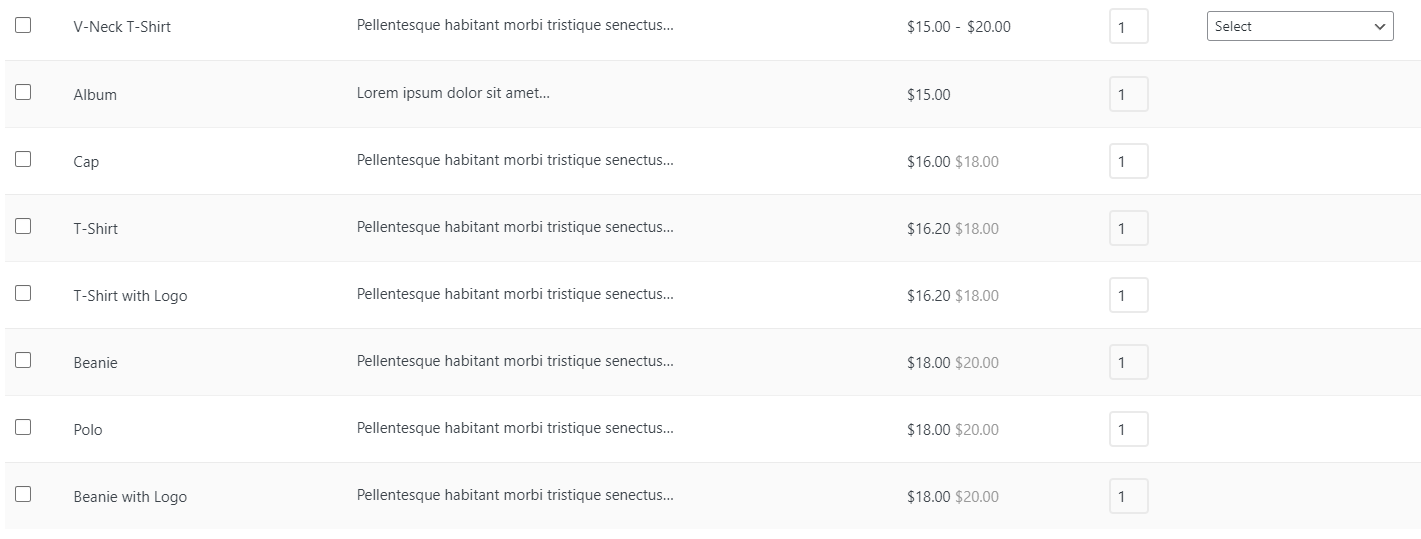
Now let’s suppose that by repeating the above mentioned 3 steps, you have added the below columns to the table:
- Checkbox: to let customers select the products in the table.
- Title: To show product title to the customers.
- Image: To display the product image to the customers.
- Content: To show product description in the table.
- Price: To let customers compare product prices in the table.
- Qty: To allow customers to increase and decrease the number of products they need directly in the table.
- Variations: To make WooCommerce add multiple variations to the cart at once possible.
Add to cart button:
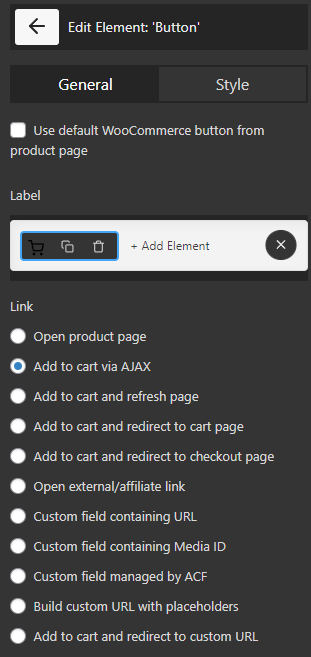
To show the Add to Cart button to the product table, try to:
- Choose the Button element from the left panel.
- In the General tab, select the Cart icon for the Label.
- Choose Add to Cart via Ajax from the Link items.
Step 3: Activate multiple products to cart for WooCommerce in the plugin
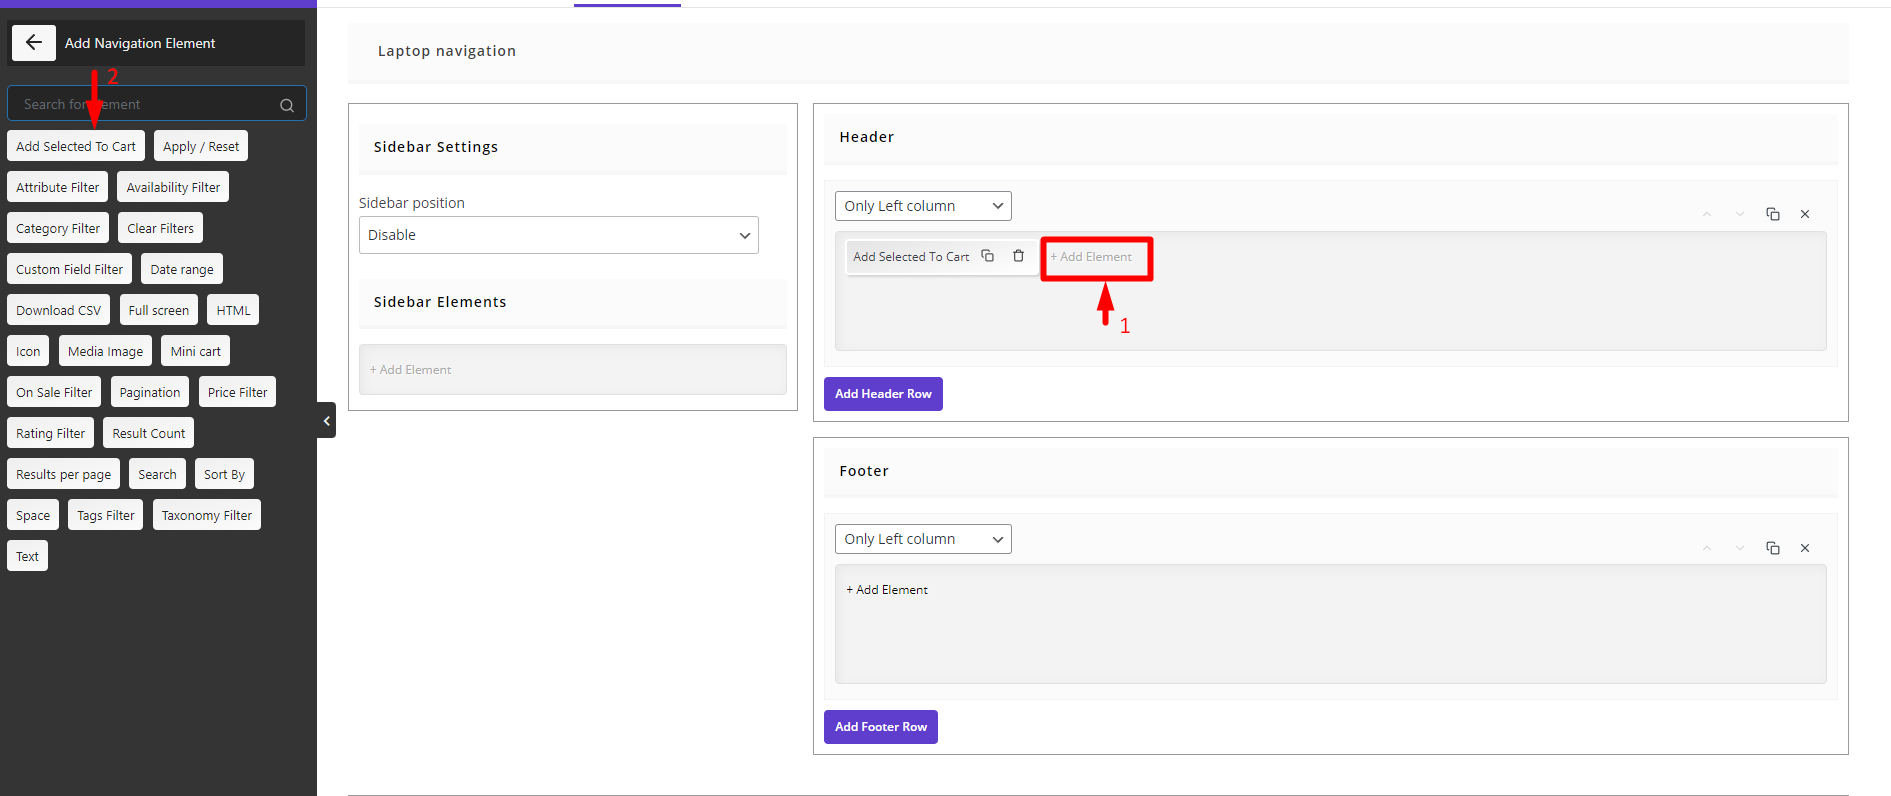
If you want to enable WooCommerce to add multiple products to cart at once, it is required to activate this option in the Navigation tab of the WooCommerce product table plugin. To do this, follow the below instructions:
- Press the Add Element option in one of the navigation bars, including Header, Footer, or Sidebar.
- Choose Add selected to Cart element from the left panel.
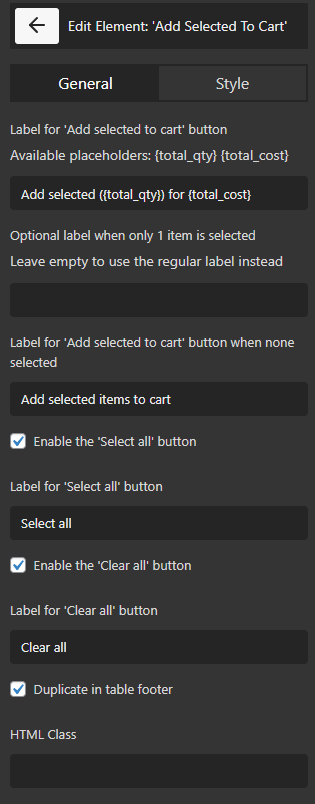
- Customize the element in the General and Style tabs. For example, in the label box, you can write any message to be displayed on the button to your customer. By default, the message is “Add selected items to cart“.
Step 4: Display the product table on the shopping page
The final step is displaying the product table on the shopping page of WooCommerce by following the below steps:
- Write a name for your table on the top of the screen.
- Click on the Save button.
- Click on the copy shortcode button.

- Go to the WordPress dashboard and open a new page.
- Paste the shortcode on the page and publish it.
- Go to the WooCommerce settings > products.
- Open the dropdown list in front of the Shop page and choose the product table page.
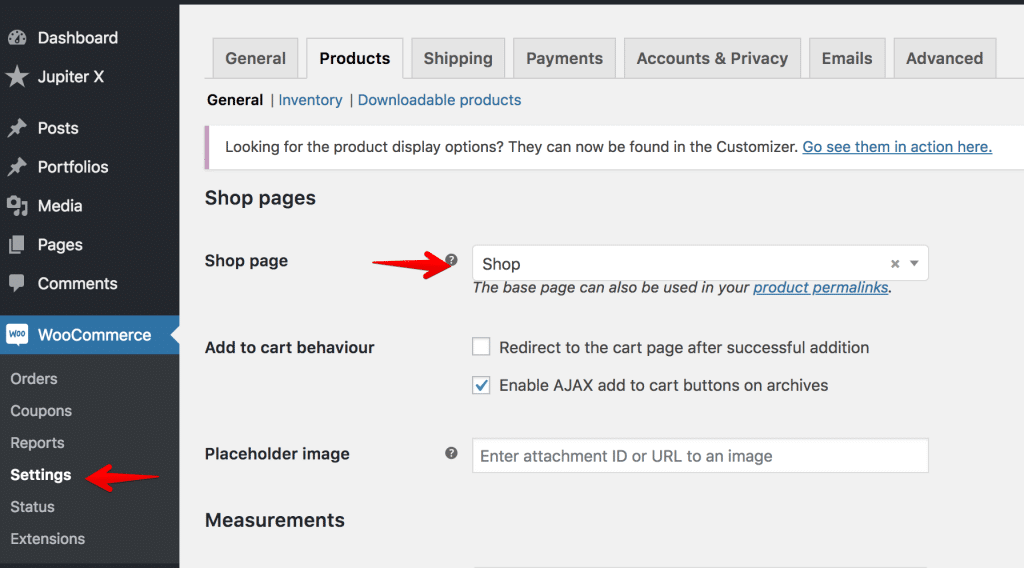
Now, if you visit the shop page of your website, the result looks like below:
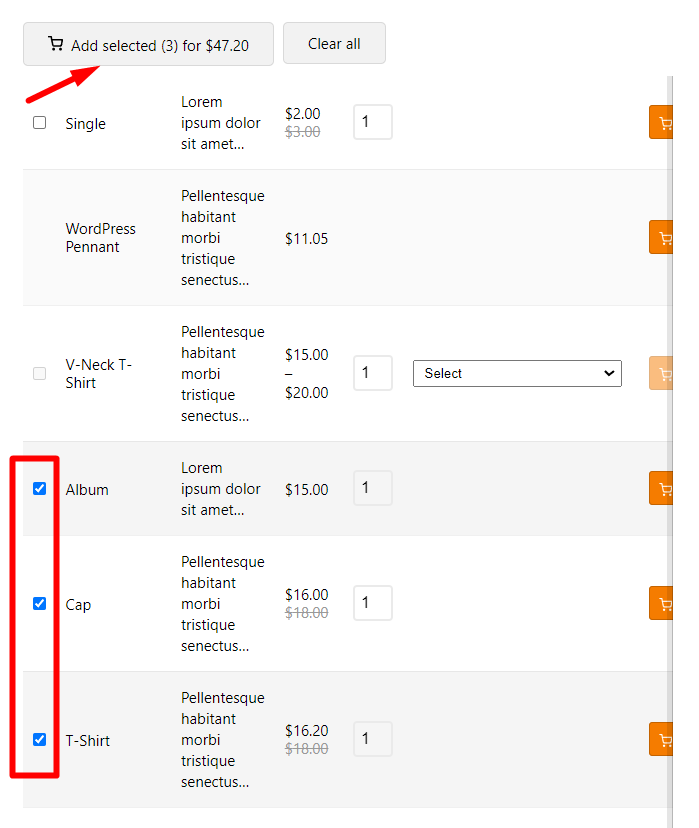
So, when your customers select some products from your website, they can add them to their cart just by clicking on the add selected items displayed on the product table header.
Extra features of the WooCommerce product table plugin
The features you can add to your product table by using our plugin are unlimited. We provide almost all the options that you may need to add to the table to make an amazing shopping experience for your customers. Here, you can get familiar with some of them:
Search and filter
Adding a search box and filters to the Navigation bars are essential when you want to grab the attention of potential customers. These items are designed as different elements in the WooCommerce product table plugin. So, as we mentioned earlier, you can go to the Navigation tab and try to add a search box or filter elements from the left panel to the Header, Footer, or Sidebar of your table.

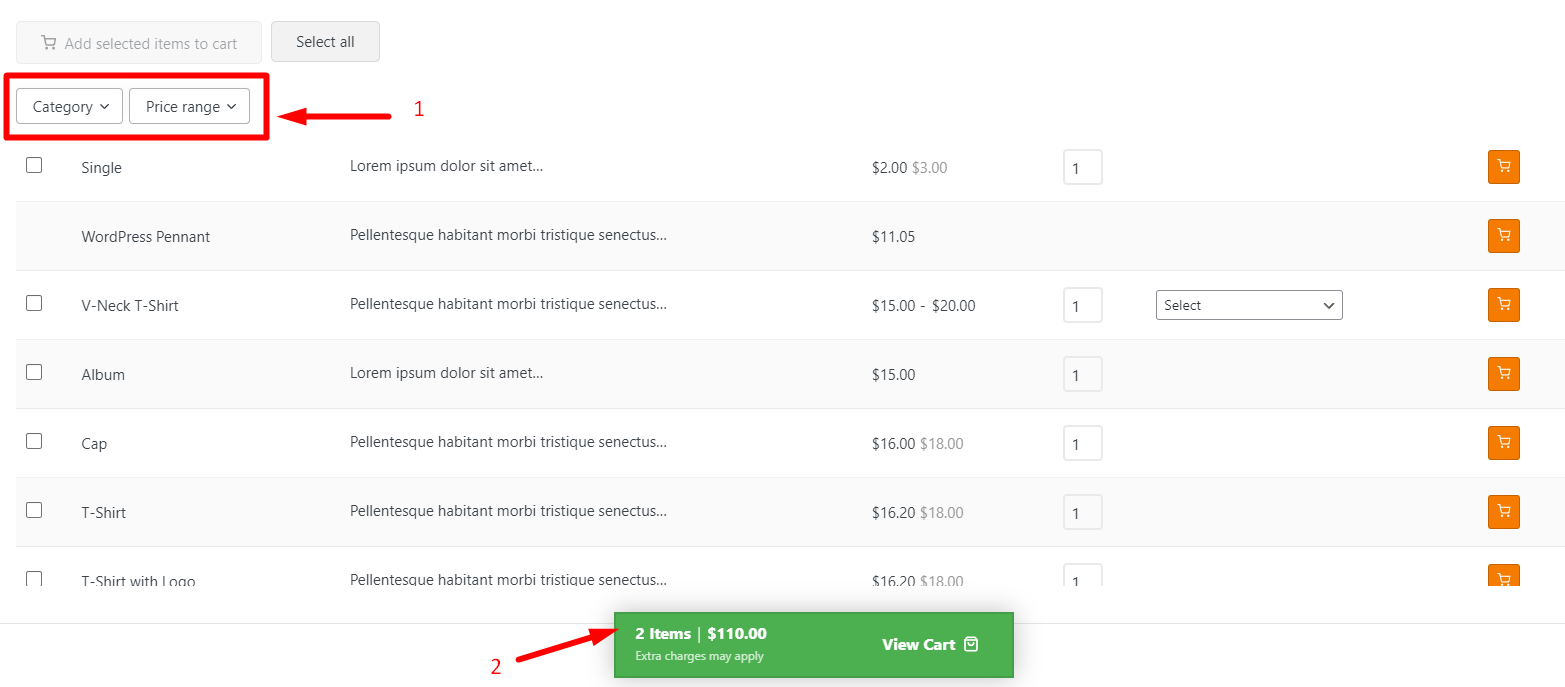
For example, we have chosen a Category filter and price filter to be displayed on the Header.
Display Minicart
Another amazing feature of this plugin is displaying Minicart to the customers on the shopping page. To make this happen, you can choose a Minicart element from the element panel of the Navigation tab.
For example, we tried to add the mini cart to the footer of our product table:
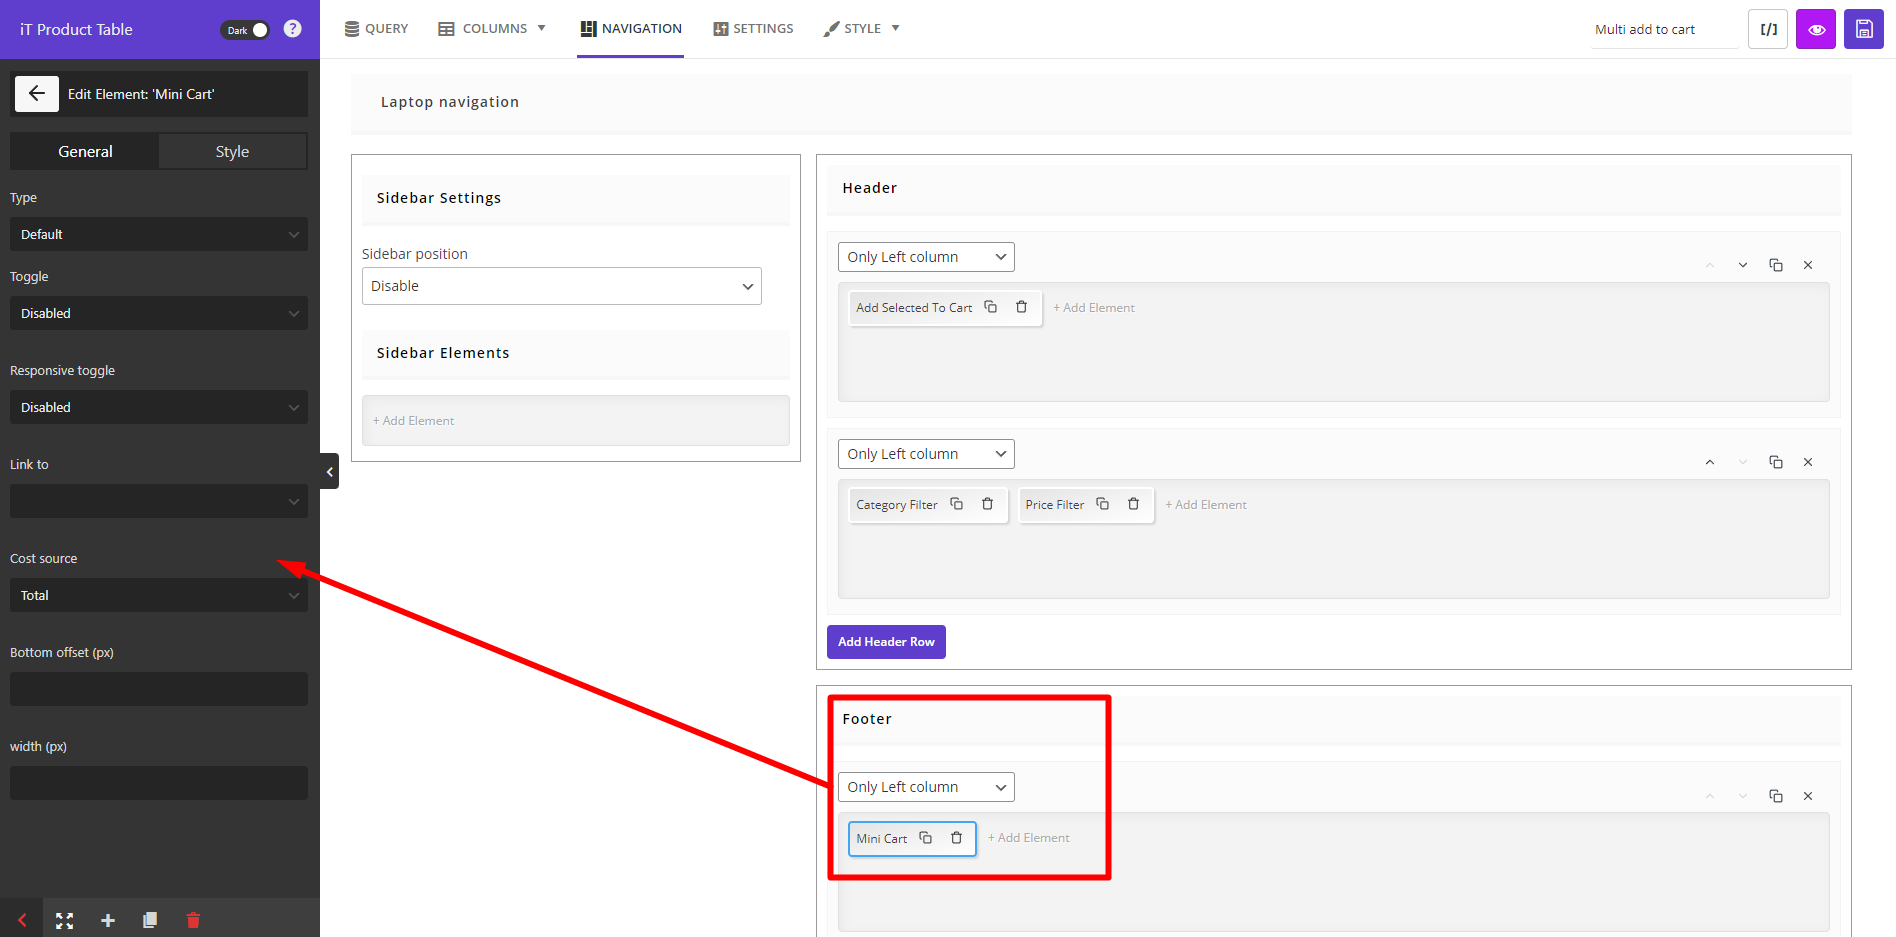
Like other elements, it is possible to customize Minicart content and appearance by changing the items in the General and Style tabs, respectively.
The result of adding these features to the product table is creating a customer-friendly product table, as shown in the below picture:
What are the advantages of bulk add to cart for WooCommerce?
The biggest advantage of enabling bulk add to cart for WooCommerce is making a better experience for your customers when they are purchasing products from your shop. This useful feature can help buyers choose multiple products quickly and go through the checkout process easier. Simplifying the purchasing process has a great impact on increasing lead generation and boosting your sales.
WooCommerce Product Table Plugin
The easy way to bulk add products to WooCommerce cart

When do you need to add multiple products to cart feature on your online store?
The bulk add to cart for WooCommerce is an amazing feature for making a great buying experience for customers. However, activating this feature is not necessary for all online stores. We recommend you let your customers add multiple items to the cart when:
- You are selling small and low-priced products.
- You are offering to pack the multiple items that customers selected in a box.
- You have an online food ordering service, and your customers need to choose different items from the online menu of your restaurant or coffee shop.
- You are selling some products which must be ordered together.
Conclusion
In this post, we provide you with the most useful methods for how to add multiple products in WooCommerce. If you want to let your customers better manage their shopping process and buy products more easily and quicker from your site, you can create a customer-friendly product table with the WooCommerce bulk add to cart plugin. Here, you can find more information about the awesome features of this plugin.


